Food. Lifestyle. Love

Sunday 16 November 2014

Recipe: Apple cake and caramel glaze

Apples have never been my favorite fruits. The crunchiness, the subtle sweetness with a touch of acidity are the reasons why I dislike apples, and yet what others love about them. I had plenty of apples that I bought from the market and given by my friend. I was hoping for my hubby to eat them once a day, but it didn't turn out that way. The apples were about to turn bad that I had to make several desserts to get rid of them. Turning the apples into dessert is the only way for me to eat them, and the best way for me to finish them up quickly.


I used Elstar apples for all my desserts as it is the most abundant cultivar in the Netherlands. One of my favorite apple dessert is this apple cake recipe from Paula Deen. I made few modification especially the amount of apples I put into it. The result was juicy and flavorful cake. My hubby gave some to his friends and they enjoyed it as much as we did.


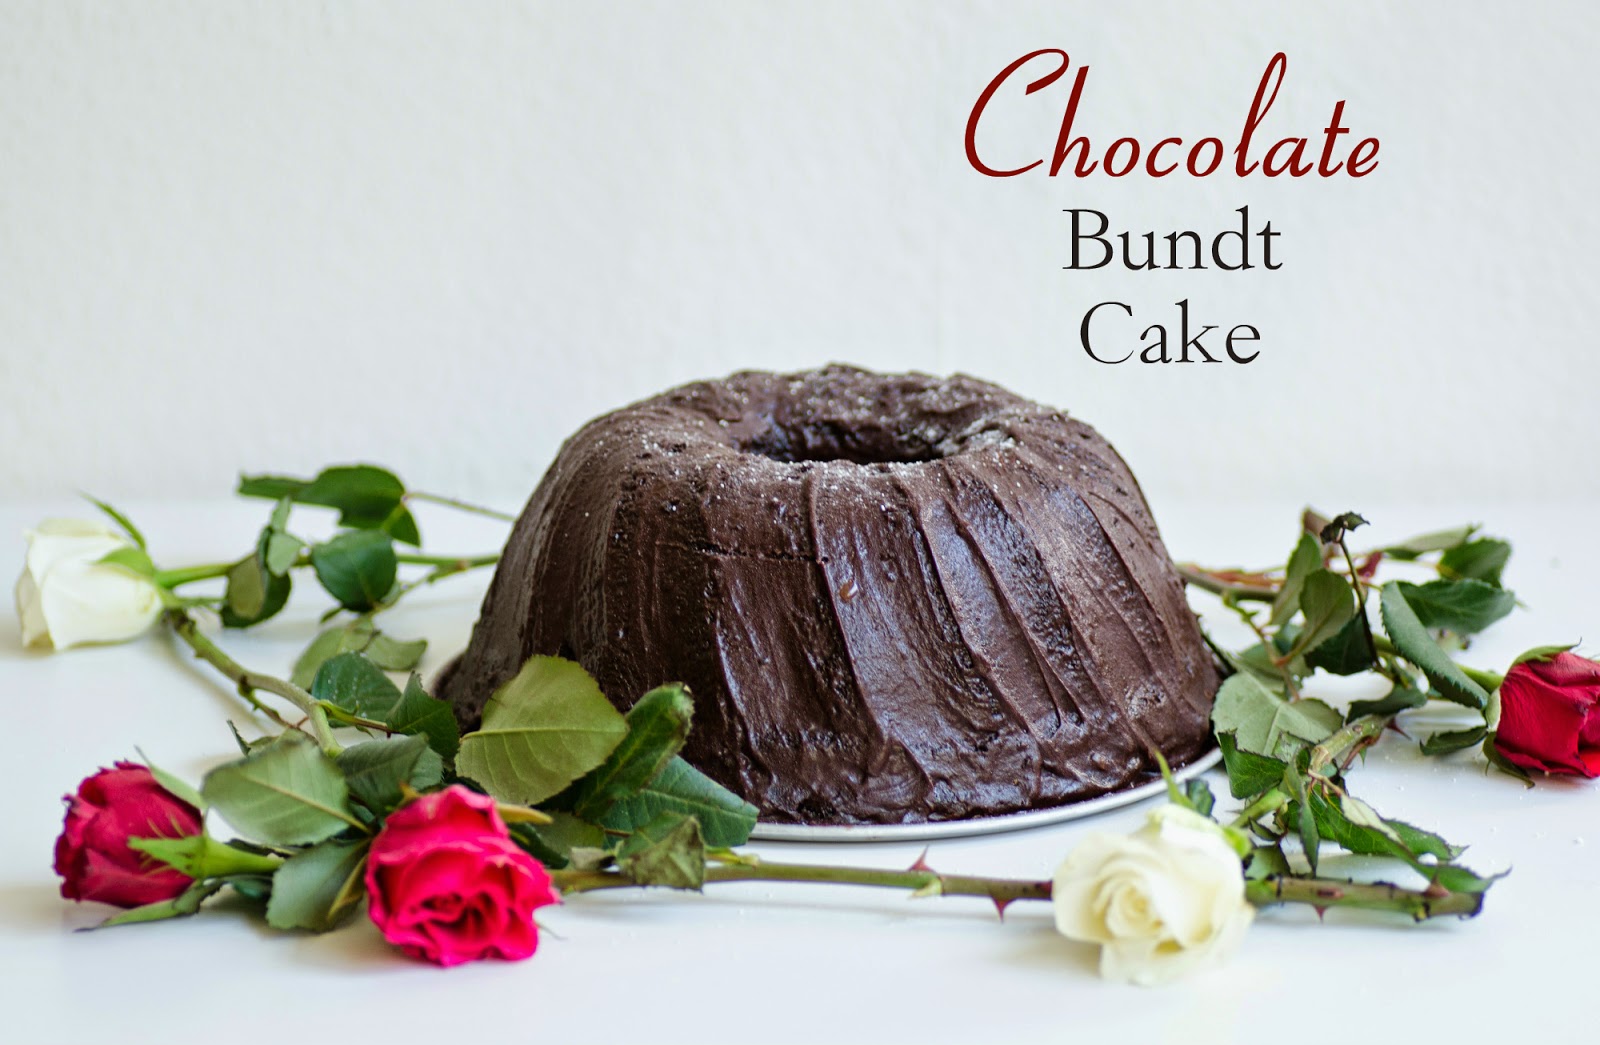
Apple cake with toffee glaze
[click for printable version]

Apple cake
6 apples, peeled and diced
1 cup roasted pecans
1 teaspoon vanilla powder 
3 cups flour
1 teaspoon baking soda
1/2 teaspoon salt
2 teaspoons cinnamon powder
1/4 teaspoon nutmeg powder
1/4 teaspoon cardamom powder
1 1/4 dark brown sugar (or more for sweeter cake)
1 1/4 cups corn oil
3 eggs

Caramel glaze
4 tablespoons butter
2 tablespoons dark brown sugar
1 tablespoon icing sugar

Method
1. Preheat the oven to 160 degrees Celsius. Lightly greased a Bundt pan and set aside.
2. In a medium bowl, combine flour, vanilla powder, baking soda, salt, the spices, set aside.
3. In a large bowl, beat the oil and brown sugar until combine. Beat the egg in the oil mixture one by one on a low speed. Add the dry ingredients into the wet ingredients, and mix.
4. Fold in the diced apples and pecan into the mixture. Scrape of the cake batter into the Bundt pan and bake for 1 hour and 30 minutes or until a toothpick inserted into the cake comes out clean.
5. Allow the cake to fully cool in the pan, and put it out onto a plate.
6. Make the glaze by melting the butter and brown sugar in a small pot on a medium heat. Set aside and combine the caramel mixture with icing sugar. Pour the glaze onto the cooled cake.


Read More

Sunday 9 November 2014

Recipe: Chocolate bundt cake with salted caramel chocolate ganache

It was late at night and I was craving to eat chocolate cake. Too much mental work made my body hunger for sweet stuff. I procrastinated and took some time to prepare bundt cake as I was lazy to make layer cake.


As I was covering the cake with chocolate ganache, I felt the presence of my husband near me. He looked at me in a weird way,  'are you going to eat that now?'  he asked concernedly. I stopped for a moment and resisted the temptation of having that one sinful bite. He has a point there, if I didn't cycle I would look like a whale by now. Reluctantly I waited the next day to gorge over the delicious cake. Besides, I think cake tastes better the next day  ;)


Chocolate bundt cake with salted caramel chocolate ganache
*I used a tea cup for the cup measurement

1 cup butter (approximately 215 g), softened 
1 3/4 cups sugar
4 eggs, at room temperature
1 cup cocoa powder (I used Valrhona cocoa powder)
2 cups flour
1/2 teaspoon salt
1 teaspoon baking powder
1 teaspoon baking soda
1 cup buttermilk
3/4 cup Greek yogurt (or sour cream)

Salted caramel chocolate ganache
60 gm butter
50 gm dark brown sugar
45 ml cream
100 gm dark chocolate (I used Valrhona)
sea salt

Method:
1. Preheat the oven to 150 degrees Celsius.  Grease the bundt pan with butter and dust it with flour.
2. Combine cocoa powder, flour, salt, baking powder and baking soda in a medium bowl, and in another bowl combine buttermilk and Greek yogurt together, set aside.
3. Cream the butter and sugar using a stand mixer on a high speed until creamy and fluffy (about 10 minutes). Add eggs one by one followed with a tablespoon of the flour mixture. Add half the flour mixture and mix until well combined followed with the buttermilk mixture and another half of the flour mixture. 
4. Pour the batter into the bundt pan and spread the batter smoothly. Bake in the oven for 50 - 60 minutes or until a toothpick inserted into the cake comes out smoothly. 

To make the salted caramel chocolate ganache
1. Melt the butter and brown sugar on a pot on a medium heat until the sugar dissolves, set aside.
2. Combine the cream and dark chocolate in a porcelain bowl and melt the chocolate in a microwave (about 1 minute and 30 seconds), set aside
3. Combine the caramel into the chocolate ganache mixture and sprinkle with sea salt.
4. Pour the ganache on the cooled cake.

*for delicious chocolate cake, use great quality chocolate and cocoa powder. Valrhona is one of the bests but you can also use Callebaut etc


Read More

Monday 27 October 2014

Recipe: Pumpkin roll with white chocolate cream cheese filling

It is the pumpkin season and I bought lots of pumpkins a month ago in the neighboring town. I made lots of delicious food from the pumpkins, and this baby is one of them. I've been wanting to make one since watching a video by Divas Can Cook a year ago and I was so happy with the result. The cake was moist, and the combination of the cake with the white chocolate cream cheese frosting was sooo good.


The roll didn't come out perfect, I think I rolled it too tightly when it was hot, but hey....it looks gorgeous! The cake looks like spider web designed and great for the coming Halloween :D


Pumpkin roll with white chocolate cream cheese filling 
*adapted from Divas Can Cook 

Pumpkin cake
3 egg yolks 
3 egg whites
1/2 cup dark brown sugar
1 cup flour
1 cup pumpkin puree
1 teaspoon baking soda
1 teaspoon cinnamon powder
1/4 teaspoon nutmeg powder
1/4 teaspoon ginger powder
a pinch of salt

Filling
200 g cream cheese (60%) (or you can use light cream cheese)
100 g white chocolate
1-2 tablespoons milk

Method:
1. Preheat the oven at 180 degrees Celsius. Grease a 10' x 15' pan generously with butter and cover it with a parchment paper and grease it again with butter,
2. Beat egg yolks in a large bowl until pale yellow and thick. Combine sugar, flour, baking soda, cinnamon powder, nutmeg powder, ginger powder and salt in a small bowl and mix the dry ingredients into the yolks. Fold in the pumpkin puree using a wooden spatula into the mixture.
3. Beat egg whites until soft peak form, and fold in the batter. 
4. Pour the batter in the pan and spread it into an even layer. Let it rest for 10 minutes and bake it in the oven for 15 minutes or until a toothpick inserted into the cake comes out clean.
5. Once the cake is done, cover the cake with icing sugar and cover it with a kitchen towel and flip it slowly.
6. Take out the parchment paper slowly, and start to roll the cake (with the kitchen towel) tightly. Set aside until it cools.
7. To make the filling, combine white chocolate with milk in a medium porcelain bowl and put it in the microwave on High for a minute. Stir the chocolate and if it is not melting put it back in the microwave for 30 seconds or more until the chocolate melts. Let it cools to a room temperature and mix it with the cream cheese. 
8. After the cake has cooled down, spread the frosting on the cake evenly. Roll the cake and slowly peeling out the kitchen towel. Wrap the cake with an aluminum foil and plastic wrap and put it in a fridge overnight (this helps in developing the flavor). 
9. Dust the cake with icing sugar and slice it.


p.s: I recommend you to watch the video by the Divas Can Cook for you to have a better idea how to do it. Enjoy! :)

Owh, and Happy Deepavali and Maal Hijrah to all who are celebrating them :D
Read More

Sunday 12 October 2014

Recipe: Quintuple chocolate cake

Last Eid al-Adha I made a chocolate cake to celebrate with the Malaysians here. When my friends asked me the name of the cake, I was dumbfounded. 'It's a chocolate cake' I replied. I find it really cheesy to name a food something out of the ordinary - e.g super duper marvelous chocolate cake, kek coklat buaian mimpi...well you get what I mean. Hence, I called it based on the number of chocolate I used to make it - five (quintuple)!  I blamed my scientific side for this.


The cake is made of chocolate sponge cake filled with chocolate hazelnut (a.k.a homemade Nutella) mousse, white chocolate mouse, dark chocolate mousse and covered with chocolate ganache. It may seem like the cake is inspired from the famous Chocolate Indulgence cake from the Malaysian chain cake store the Secret Recipe ; however, my friend 'A' is the one who really responsible behind this cake.


'A' is a French, and like any other French in my opinion is really particular with food and cooking. When I was baking with 'A,' I can see the huge difference in our style. I'm the campak-campak (this is a slang in Bahasa meaning you throw whatever you have) type of person and adjust the food based on my personal taste. My style is quick and I lack patience (but I do produce good food :D ).  'A' on the other hand really puts effort, time, energy and love when she's baking. I was impressed with her patience, and I can see why she said it takes her three hours just to bake a cake. 'A' taught me how to make mousse, which is easy to make but with a lot of care. She even gave me tips on baking that she learns from herself and family. As for that, this cake is inspired by my friend 'A' who is really dedicated in cooking/baking/whatever she is doing. I can't believe I spend more than seven hours to make and decorate this cake, which usually takes me the most two hours to make other cakes.


So yeah, if you like to make this cake remember that you need to put a lot of care (and love), but most importantly patience!


Quintuple chocolate cake
[click for printable version]
*for best result use good quality ingredients

Simple homemade Nutella
200 gm milk chocolate
200 gm ground hazelnut
1 tablespoon vegetable oil (if desired)
1 tablespoon cocoa powder

Mousses
400 ml cream - beat until soft peak forms
100 gm of homemade Nutella
100 gm white chocolate (plus 2 tablespoons milk)
100 gm dark chocolate

Chocolate sponge cake
200 gm butter
200 gm sugar
150 gm flour
50 gm cocoa powder
2 teaspoons baking powder
3 eggs

Chocolate ganache
100 gm dark chocolate
100 gm milk chocolate
200 ml cream


Method:

To make homemade Nutella
1. Roast the ground hazelnut on a pan until brown, set aside to room temperature.
2. In a ceramic bowl, melt the milk chocolate in a microwave (about 1 minute or more), set aside.
3. In a food processor, put the roasted hazelnut and mix until it becomes a paste. You can add oil if you want as this helps with making it becoming a paste faster. Add the melted chocolate and cocoa powder and mix until the mixture becomes smooth. Scrap of the homemade Nutella and put 100 gm in a ceramic bowl and the rest in a glass jar (you can keep this up to a month or more in a fridge)

To make chocolate mousses
1. In a ceramic bowl add the white chocolate with milk and melt them in a microwave (putting milk helps in melting the white chocolate easily - tips that I learnt from 'A'), set aside. Repeat with the dark chocolate in another separate ceramic bowl.
2. Once all the chocolates have cooled down to a room temperature, divides the whipped cream into three parts (approx. 133 gm of whipped cream for each chocolate).  Put two tablespoons of the whipped cream into the melted chocolate at a time and stir until the mixture well combined (this helps in preventing the fat in the cream to curd instead of putting all the cream inside the melted chocolate) . Repeat until approx 133 gm of whipped cream is used per chocolate. Do the same thing for the rest of the chocolates.
3. Cover the mousses with plastic wrap and put them in the fridge until needed (you can do the mousses a day before to make them more stable)

To make chocolate sponge cake
1. Preheat the oven to 180 degrees Celsius. Mix the flour, cocoa powder and baking powder in a small bowl and set aside.
2. Beat the butter and sugar on a high speed using a mixer until it becomes white and fluffy (about 10 minutes).  Add one egg at a time following with a tablespoon of the flour mixture. Repeat with the rest of the eggs. Fold in the rest of the flour with a wooden spatula, and divide the cake batter into four 6' cake pans that have been oiled and lined with baking paper.
3. Bake the cake for 30 minutes or more until a toothpick inserted into the cake comes out clean.
4. Put the cake pan on a wire rack for 10 minutes, invert the cake pan and take out the cake and let the cake cools down to a room temperature.

To make chocolate ganache
1. Mix everything in a ceramic bowl and melt the chocolate in a microwave, stir and set aside.

To assemble the cake
1. Level each layer of the cake with a serrated knife. Put one layer of the cake on a cake board and spread the milk chocolate hazelnut mousse, followed with another layer of the cake, white chocolate mousse, another layer of cake, dark chocolate mousse and the last layer of cake.
2. Crumb coat the cake with the leftover mouse (or chocolate ganache) and put it in the fridge for about two hours (or more) until the crumb coating is set. Cover the cake with chocolate ganache and leave it for an hour or more before serve.


Enjoy and Eid Mubarak again! :D

p,s: This cake gone in a minute during the gathering. The most well liked cake by the rest so far. Too bad I'm a vanilla person or I would I have enjoyed this cake more haha


Read More

Monday 6 October 2014

Recipe: Kuih seri muka labu (glutinous rice with pumpkin custard layer)

Few months ago I wrote a recipe of my favorite kuih - kuih seri muka . Well, weeks ago I made a fusion version of my favorite kuih using pumpkin custard as the top layer (labu = pumpkin). The combination of sticky rice with pumpkin tastes great, and I was surprised how it turns out to be. It's like enjoying both of my favorite Malaysian and American desserts in one bite (I love the American pumpkin pie!).

Instead of using a microwave to cook the sticky rice I used a rice cooker, and I must say that I'm going to stick with using that from now on. It didn't create mess like what I had experienced before (it must be the springform pan...geez). Anyway, since now is the pumpkin season *yeay* why don't you just give this recipe a try. It's a great way to impress your family and friends ;)


Kuih seri muka labu
[click for printable version]

Bottom Layer (glutinous rice):
200 g glutinous rice (soaked for an hour, drained)
125 ml coconut milk + 125 ml water
1 tsp salt

Upper layer (pumpkin custard):
3 large eggs
500 gm pumpkin - roast until soften
1/2 cup coconut milk
5 tablespoons dark brown sugar (or to taste)
1 teaspoon cinnamon powder
1/4 teaspoon nutmeg powder
1/4 teaspoons salt

Method:
1. Cook the rice in the rice cooker until set. Fluff up the rice using a fork and put it in a 24 cm springform pan which has been oiled and press the rice until compact, set aside.
2. Combine all the ingredients for the custard in a food processor and processed the mixture. Pour the custard layer on top of the rice layer and bake in the 180 degrees Celsius for 40 minutes or until the custard layer becomes brownish.
3. Let the kuih cools to a room temperature, and cut it using oiled knife.

p.s: This dessert tastes sooo good despite the look haha


Read More

Sunday 5 October 2014

Recipe: Moussaka

Moussaka is one of my favorite dishes. It's like a cross between lasagna and ratatouille - all the delicious goodness layered together and tastes awesome!

So this is the 'unauthentic version of my moussaka, and...it's a great way to finish up all those leftover vegetables haha. 


Moussaka

Meat sauce
2 tablespoons olive oil
250 gm minced beef
3 large tomatoes - roast for 30 minutes or until tender and peel of the skin
2 cloves garlic
half large sweet onion
1 tablespoon tomato paste
salt and pepper to taste
1 teaspoon dried basil
1 teaspoon dried marjoram
1/2 teaspoon ground cumin

1 large eggplants - thinly cut and drizzled with salt for 10 minutes and rinse
1/2 large green zucchini - thinly cut
1/2 large yellow zucchini - thinly cut
1 large potato - thinly cut
2 tablespoons olive oil
a pinch of saffron, turmeric powder salt and pepper
200 gm of cottage cheese (you can omit this if you want)

Egg custard 
3 eggs
6 tablespoons Greek yogurt
100 gm Gouda cheese (or your favorite cheese)
salt and pepper to taste

Method:

To make the meat sauce and potato filling
1. In a large pot on a medium heat put the olive oil and sauteed the garlic and onion until aromatic and put in the minced beef until browned. Put in the rest of the ingredients and stir well. Increase the heat and wait until the meat sauce thickens and turn off the heat and set aside.
2. Put the olive oil in a pan over a medium heat and sauteed the potato with saffron, turmeric powder, salt and pepper until each side browned. Set aside

To make the egg custard
1. Combine all of the ingredients in a large bowl and set aside.

To assemble
1. Put the fried potato at the bottom layer of a casserole dish followed with meat sauce, cottage cheese, eggplants and zucchini. Repeat the layer and cover the filling with the egg custard. Bake at 180 degrees Celsius for 40 minutes or until the custard browned. 


p.s: Moussaka tastes great the day after as the flavors developed.

Owh yeah, Eid Mubarak guys! Hope you guys have a great Eid al-Adha :)


Read More

Sunday 28 September 2014

Recipe: Clementine cake - gluten free and dairy free

You know that feeling when you finished watching a movie and you just have to try/eat/do/travel because the movie is affecting you so much. Well, that happens to me a lot.....especially when food is involved. The most recent 'I-have-to-make-this' feeling was when I watched The Secret Life of Walter Mitty months ago when I was still in Malaysia. Too bad I can't find clementines in the country thus the planned was postponed for a while.


It was not until recently when I went pumpkin hunting that I had the chance to buy clementines and bake similar cake in the movie *weee* The cake was based from this recipe with slight modification. I was pretty doubtful before making the cake as the recipe didn't call for butter or oil, but changed my mind once I bite the cake. It was so moist! And yeah, tastes great too! The moist comes from the clementine puree and the eggs.


To make the cake more healthy use natural sweetener instead. You can use maple syrup and dried dates instead of processed sugar and the taste will still be amazing!


Clementine cake
[click here for printable version]

5 clementines
150 g dark brown sugar
200 g ground almond
100 g coconut flakes
1 teaspoon baking powder
1 teaspoon vanilla powder
1 teaspoon cinnamon powder
1/4 teaspoon nutmeg powder
1/4 teaspoon allspice powder
6 large eggs, lightly beaten
3 tablespoons icing sugar (or more for glazing)

1. Put clementines in a large pot and cover with water. Boil clementines for 2 hours or until soften and set aside until they cool down to room temperature and puree them using a blender. Use 3/4 of the total puree for cake, and the rest for glazing.
2. Preheat the oven to 180 degrees Celsius. Greased your desired pan (I used a Bundt pan). Combine brown sugar, ground almond, coconut flakes, baking powder, spices and vanilla powder in a large bowl. Make a well in the middle of the dried mixture, and put 3/4 of the clementine puree and eggs and fold the mixture gently. Pour the batter in the cake pan and bake for 40 minutes or until a toothpick inserted in the cake comes out clean.
3. To make the glaze, mix the rest of the clementine puree with icing sugar (I like to make mine less sweet, thus it becomes more runny) and pour on the cooled cake.


This cake goes really well with tea and coffee. Enjoy!

p.s: If you can't find clementine, you can use tangerine instead. Take out the seeds and boil the skin and flesh until soften. The good thing about clementine is that it is seedless.

Read More

Monday 22 September 2014

Recipe: Berry poke cupcakes

A while ago my friends I and C came to me and said "if you don't make cake for us, we will put your name on the ice bucket challenge." I was dumbfounded for a while, and the three of us laugh hysterically. Those two are among the perkiest people in the department, and I knew they didn't really mean what they said. However, I did bake cake for them and others in the department as I love baking, and it was fun succumbing to their crazy 'threat' ;)


This cake is a modified version of the Victoria's sponge cake, and it is one of my favorite! To have fluffy cake, use cake flour instead of normal flour, and whenever you mix eggs one by one in the batter, always put a tablespoon of the dry ingredients to prevent the eggs from curdling.

Berry poke cupcakes 
(make 2 9' cake or 18 large cupcakes)
[click for printable version]

Cake
300 gm cake flour
300 gm unsalted butter
300 gm castor sugar
6 eggs (or 300 gm eggs)
3 teaspoons baking powder
1 teaspoon vanilla powder

Blueberry compote
200 gm blueberries
4 tablespoons castor sugar
1 cup water

400 ml whipping cream - whipped until fluffy
250 gm fresh berries of your choice (I used strawberries)

Method:

To make the cake:
1. Preheat oven to 180 degree Celsius. Mix baking powder, vanilla powder and cake flour in a small bowl, set aside.
2. Beat butter and sugar in a large bowl until creamy and fluffy (about 10 minutes). Beat eggs one by one into the butter mixture with one tablespoon of dry ingredients for each egg to avoid the batter from curdling.
3. Fold the rest of the dry ingredients into the butter mixture with wooden spoon, and pour the batter in the cake pans or cupcake liners. Bake for 30 minutes or until a skewer inserted into the cake comes out clean.

To make blueberry compote:
1. Mix all the ingredients in a large pot on a high heat until boiling. Reduce the heat until the compote becomes thick

To assemble:
Poke the cake/cupcakes several times with a fork. Pour the blueberry compote on top of the cake followed by the whipping cream. Decorate with fresh fruits


I'm glad you guys love the cake! :D And happy belated birthday to I (I baked the same cake for her) ;)

p.s: Fun facts - in the Netherlands, when it is your birthday you are the one bringing the cake to the office and people will shake your hand and congratulate you. In Malaysia on the other hand, your close friends bring the cake for you to celebrate your birthday. So I (if you read this post), you should be prepared for my cake next year hehe

Read More

Sunday 17 August 2014

Recipe: Cinnamon rolls with chocolate chunks and cream cheese glaze

I always looked forward when my sister came back home from boarding school when I was young. She always brought back sweet treats for us - Dunkin Donuts, Auntie Anne's pretzels, and cinnamon rolls from Cinnabon, which we rarely eat and pretty hard to find back then. I always enjoyed eating them, and always asked my sisters to buy for me whenever they came back home, or went out for shopping at big cities.

Over the years, I got fed up eating those sweet treats. They are good, but too sweet for my liking. Plus, I find that they are not 'purse-friendly' for a frugal and cheapskate student like me.


Beside from the fact it is more economical preparing my own food, I can also control the amount of sugar and adjust the taste based to my liking. It is more enjoyable that way, at least I will be more satisfied with what I prepared no matter how shitty the food turns out to be.

I've been wanting to eat cinnamon rolls, so I woke up early this morning and prepared this easy cinnamon rolls recipe. It took me about 1 hour (more or less) to prepare them, and they are insanely good to eat when they are still warm. We ate them with milk coffee, and I wish I could prepare them almost every day haha.


As requested by many, and I don't have anything to do at the moment due to my laziness and cold weather, here is the recipe for these delicious cinnamon rolls (the Germans call them Zimtschnecken - cinnamon snails haha so cute :3). I was hoping to bring them tomorrow for my office mates, but I might have to cancel the plan as we kept eating them *sorry guys*


Cinnamon rolls with chocolate chunks and cream cheese glaze (adapted from Gimme some oven)
[click for printable version]
note: I love my baked goods to be less sweet, do add more sugar based on your liking.

Ingredients
Dough:
1 cup full cream milk
1/4 cup butter
1 envelope instant yeast (approx. 2 1/4 tsp)
3 1/2 cups all-purpose flour
1 tablespoon castor sugar
1/2 teaspoon salt
1 egg

Cinnamon-sugar filling with chocolate chunks:
4 tablespoons dark brown sugar
2 tablespoons ground cinnamon
4 tablespoons butter, softened
50 gm dark Valrhona chocolate, chopped into pieces

Cream cheese glaze:
1/2 cup butter, softened
1/4 cup cream cheese, softened
6 tablespoons icing sugar (or more)
2 tablespoons milk
Method

To make the dough & filling:
1. Combine milk and butter in a porcelain bowl and heat on High in the microwave for 1 minute. Remove, stir and repeat the step until the butter melts. Keep aside until the milk becomes warm to the touch.
2. Combine the warm milk and yeast in a large bowl, and stir. Add 3 cups flour, sugar and salt and mix using hand mixer with dough attachment and knead until the ingredients are fully combined. Add egg and knead for few minutes using low speed, if the dough sticks to the side add more flour a tablespoon at a time until it doesn't become sticky. Knead for another 5 minutes using low-medium speed.
3. Cover the bowl with damp cloth (or plastic wrap) and let rest for 10 minutes at warm place.
4. Meanwhile, make filling by whisking dark brown sugar and cinnamon in a small bowl.
5. When the dough is ready, put generous amount of flour on work surface and pun the dough on it. Flatten the dough using a rolling pin into a large rectangle (about  14' x 9'). Cut out the sides to make perfect rectangle. Spread the softened butter on top of the dough using hands or pastry brush. Sprinkle the cinnamon and sugar filling all over the dough and sprinkle chocolate chunks on top of it.
5. Roll up the dough as tightly as possible, and cut into 11-12 pieces using knife. Put them on a greased 13' x 9' rectangular with about 1/2 to 1 inch apart.
6. Cover with damp cloth, and let them rise for 25 minutes at warm place.
7. Bake for 20 - 30 minutes at 180 degrees Celsius until the rolls are golden brown. Take out from the oven and let them cool for about 5 minutes and sprinkle with cream cheese glaze, serve warm.

To make the cream cheese glaze:
1.  Combine everything in a small bowl and mix using handheld mixer. Add more sugar if desired, sprinkle on top of warm rolls.


Read More

Saturday 26 July 2014

Recipe: Triple Strawberry Cake & Selamat Hari Raya! Eid Mubarak!

It was breaking fast together with the Malaysians at Wageningen last week. The host prepared delicious chicken biryani rice and kuih, and the rest brought other foods and drinks. Knowing there will be lots of food (if it is Malaysian get-together, there WILL be plenty of foods), I decided to bake strawberry cake for dessert. It is not heavy and filling like chocolate cake, thus it is perfect for such event.

I was full from gorging over the delicious biryani, but I had to try a small slice of the cake that I made. It was awesome! Not that sweet and moist, and I had to take another small slice of the cake haha.

This cake will be perfect for Hari Raya open house- in Malaysia the Muslims invited their family and friends for small (or big) feast to celebrate Eid-fitr (a celebration that marks the end of Ramadan).


Triple Strawberry Cake
[click for printable version]

Strawberry Cake (white cake recipe adapted from add a pinch)
1 ½  cup butter, softened
12 tablespoons castor sugar
5 eggs, room temperature
3 cups all-purpose cake flour
3 teaspoons baking powder
¼ teaspoon salt
½ cup whole milk, room temperature
½ cup buttermilk, room temperature
1 teaspoon vanilla extract
2 cups chopped strawberries

Strawberry sauce
4 cups water
2 tablespoons castor sugar
1 1/2 cups chopped strawberried

Strawberry cream cheese frosting
400 gm cream cheese (I used 60% fat content)
60 gm icing sugar
5 tablespoons strawberry sauce

Method:

For cake
1. Preheat the oven to 180 degrees C. Grease and line four 6-inch cake pans.2. In a large bowl cream butter until light and fluffy with a hand mixer. Slowly add sugar and mix well. Add eggs one at a time making sure to fully incorporate each egg before adding another.
3. Sift together cake flour, baking powder, and salt in another bowl. Add to butter mixture alternately with milk, buttermilk and vanilla beginning and ending with dry ingredients. Stir until well combined and scrape down sides and bottom of bowl and mixed well.
4. Divide into 4 cake pans evenly. Bake for 30 minutes or until a toothpick inserted in the center comes out clean. Remove and allow to cool slightly in cake pans for about 10 minutes, then cool completely on a wire rack.

For sauce
1. Combine everything in a large pot on high heat. Once the water boil, turn the heat to medium-low. Mash the strawberry using potato masher. Simmer the sauce until thickens (approximately 15 minutes or more)

For cream cheese frosting
1. Put everything in a large bowl and mix well.

To assemble: Level the cake using serrated knife or cake cutter, put strawberry sauce on top of the cake and strawberry cream cheese frosting. Repeat for every layer. Cover and crumb coat the cake with strawberry cream cheese frosting for an hour, and cover the cake with the rest of the frosting. Decorate with slices of fresh strawberries and strawberry sauce.


Eid Mubarak in advance guys! Selamat Hari Raya Aidilfitri to all :D
Read More

Thursday 24 July 2014

Recipe: Kuih seri muka (glutinous rice with pandan custard layer) using microwave

Kuih is a bite size sweet or savory snack which you can find easily in Malaysia. Kuih seri muka (literally means glowing face dessert) is one of my most favorite Malay kuih. The layer of creamy and sweet pandan custard complements the salty glutinous rice. I always make it whenever I'm not in Malaysia when it is impossible to buy one.

The first time I made this was in the U.S, and I used imitation pandan flavoring and green food coloring for that. I'm planning to cut down imitation flavoring and coloring in my cooking, and I was happy to find frozen pandan leaves at Toko Idriani (Asian market) in Wageningen.

A problem in making this kuih for me is steamer, I don't have one, and I don't feel like buying one as it is rather expensive here (I'm a cheapskate student). So, I decided to use what I have at home - microwave! I've heard my friends cook rice using microwave, so it is possible to do for glutinous rice as well.

The recipe was based from The Hungry Excavator with slight modification. There is not much difference with the result, but I think steaming makes this kuih more fluffy. You can try this method if you are in a hurry, or if you don't have a steamer at home ;)


Kuih Seri Muka
[click for printable version]

Pandan Water
12 pandan leaves, cut into pieces
100 ml water

Bottom Layer (glutinous rice):
200 g glutinous rice (soaked overnight, drained)
125 ml coconut milk + 125 ml water
1 tsp salt
2 pandan leaves (knotted)

Upper layer (pandan custard):
2 large eggs
80 g castor sugar
200 ml coconut cream + 100 ml water
10 0ml pandan water
40 g tapioca flour
25 g plain flour
1/2 tablespoon corn flour

Method:

To make pandan water:
1. Blend the pandan and water in 3-4 batches, strain the mixture.

To make the kuih
2. Mix the rice, coconut milk solution, salt in a 24 cm springform pan, add pandan leaves on top and cook using microwave power high for 7 minutes, and using 60% power for 10-15 minutes (or until the rice is cooked). *If coconut water mixture drips from the pan, add more coconut water, and do the same if the glutinous rice is still dry and not cooked. 
3. Take out the pandan leaves, and set the pan  aside

To make custard layer:
4. Whisk the eggs and sugar until sugar is dissolved. Add in pandan water, coconut cream, water and mix well.
5. Sift in all the flours and whisk till well combined, strain the mixture into a large pot and let rest for 10 minutes.
6. Under medium heat, stir the custard mixture using wooden spatula until just thickens (don't overcook it).
7. Pour mixture over the rice and push the air bubbles to the site.
8. Put in the microwave and cook using 60% power for 15 minutes (or until custard layer is done)
9. Allow to cool, and cut it into rectangular shape using a knife that has been oiled.


p.s: Coconut cream is the concentrated version of coconut milk. If you can't find coconut cream, just use more coconut milk without diluting it with water.


Read More

Sunday 20 July 2014

Recipe: Seafood 'Paella'

I have been wanting to eat paella (pronounced 'paeyya') after looking at my friends photos (urgh Khalis and Adilla!). I tried once at a Spanish restaurant in Malaysia, but was disappointed with the the taste. It was flavorful, but was too salty. Maybe it was not my day, but you might be lucky and not get salty paella when you eat there.

After looking for few recipes, I decided to make my own version of paella (thus explaining the name 'paella'). I used basmati rice instead of calasparra or bomba rice, used cast iron pan instead of paella pan and omitted frozen green peas that I hate so much (not sure if the original version even has this). It is not authentic, but the taste is about the same. My husband did say that it is not as flavorful as the original Spanish version, so I think it might be because I didn't use the Spanish paprika and I didn't put mussels in it.

Anyway, if you want to try paella, but lack the ingredients and paella pan, you can try using my version. You can put any seafood that you like. I was tempted to put oysters put my hubby hate them (how can someone hate oysters?!).


Seafood 'Paella' (recipe adapted from Adora's Box and Fine Cooking)
[click for printable version]

Ingredients:

2 pinches of saffron
8 cups of shrimp broth (leftover shrimp shells, water, 2 pieces tomatoes)
1 small yellow onion
1 large ripe tomatoes 
1 tablespoon tomato paste
1/4 cup plus 2 tsp. extra-virgin olive oil
8 medium cloves garlic, 4 finely chopped, 4 peeled but whole
1/2 tsp. sweet paprika powder
Salt
pepper
1 1/2 cup of basmati rice (soak for 30 minutes and drain)
1 red capsicum, cut into squares
12 prawns with shell
5 squids, cut into pieces
200 gm salmon, cut into cubes
1/2 lemon, cut into wedges 

Method:

Make the sofrito
1. Halve and peel the onion. Grate the onion to get about 1/3 cup of onion purée. Cut the tomato in half and grate the tomato halves all the way down to the skin to get about 1-1/4 cups juicy tomato pulp.
2. On a cast iron pan, over medium heat add 1/4 cup olive oil and cook the shrimps briefly, and put the shrimps aside, to the same thing to the squids. Add more olive oil to make the sofrito (up to 1/4 cup). Over medium-low heat add the grated onion, stirring occasionally, until it softens and darkens slightly, about 4 minutes. Stir in the tomato pulp, chopped and whole garlic, tomato puree, paprika powder and salt. Gently cook the mixture in the center of the pan, stirring frequently, until it’s deep, dark red and very thick, about 30 to 40 minutes. 

Make the shrimp broth
3. While waiting for sofrito to cook, put the shrimp shells in a large pot and add water and tomatoes. Bring to a boil, cover, reduce the heat to low, and simmer for 10 minutes. Strain the broth discarding the shells and add the saffron.

Make the paella
4. When the sofrito is done, add the rice and red capsicum to the cast iron pan and cook briefly over medium heat, stirring constantly to combine them with the sofrito, 1 to 2 minutes. Spread the rice evenly in the pan. Increase the heat to high and slowly pour in the 5-1/4 cups broth—try not to disturb the rice so it stays in an even layer. From this point on, do not stir the rice. Bring to a boil and then adjust the heat to maintain a vigorous simmer, repositioning the pan as needed so it bubbles all the way to the edges (the bubbles at the edge will be much smaller than the bubbles at the center). Simmer vigorously until the rice appears at the level of the broth, about 8 minutes.
5. Arrange the shrimp and squids in the pan, pushing them into the rice. Continue simmering until the liquid is absorbed and the rice is tender but still firm (taste a few grains below the top layer). Cover with aluminium foil and reduce the heat to low. Simmer the rice for about 30 minutes, keep checking if the rice is cooked and add more shrimp broth if the rice is not done.
6. While waiting for the paella to cook, prepare the salmon. Add salt and pepper to the salmon and grill for 20 minutes. 
7. When the paella is done check for any caramelized rice sticking to the pan by using a spoon to feel for resistance on the bottom of the pan. Check in several areas, especially in the center of the pan. If there is none, increase the heat to medium high and carefully cook, moving the pan around, until you hear a good deal of crackling and feel resistance, 1 to 2 minutes; if you smell burning, immediately remove the pan from the heat. Arrange salmon on the rice, let rest for 5 to 10 minutes and arrange lemon wedges on the paella. 


Read More

Saturday 19 July 2014

Recipe: Triple Lemon Cake

After watching Games of Throne, I've been craving to eat lemon cake, and I blame Sansa Stark for that. Since then, I have baked several lemon cakes using different recipes, and I like each one of it. My husband on the other hand prefers lemon cake with a dry texture. 'That is how lemon cake is supposed to be,' he said. It's funny how he becomes such a picky eater and good food critic after we got married (lalala~)

Most of the recipes that I found are for making tea cakes - which generally dry and dense. However, you can play around with the ingredients to get your desired texture. For moist cake, use oil instead of butter. You can even add more liquid (such as buttermilk, milk etc) for that. Fluffy textures requires cake flour and beating of the egg whites until soft peak and gently fold it in the cake batter.

I also reduced the amount of lemon zest in the cake batter from the original recipe as I want my cake to have nice balance of lemon taste when combined with lemon curd and lemon cream cheese frosting. Nevertheless, I used approximately five lemons for making this triple lemon cake.

The result of this cake was awesome! Very lemony and it feels so refreshing. My husband didn''t complain this time and he said it has the 'right'texture haha


Triple Lemon Cake

Lemon cake (adapted from Food Network)
125 g unsalted butter, at room temperature
12 tablespoons castor sugar
4 eggs white, at room temperature
Grated lemon zest of 3 large lemons
350 g flour
3 teaspoon baking powder
1/2 teaspoon baking soda
Freshly squeezed lemon juice of 1 1/2 lemons
200 g yogurt (I used Turkish yogurt)

Lemon curd cake filling (adapted from Fine cooking)
72 g unsalted butter
5 tablespoons castor sugar
1/3 cup fresh lemon juice
3 Tbs. lightly packed finely grated lemon zest
Pinch salt
4 large egg yolks

Lemon cream cheese frosting
250 g cream cheese (I used Turkish cream cheese)
100 g unsalted butter
2 tablespoons finely grated lemon zest
2 tablespoons cream
100 g icing sugar
3 tablespoons fresh lemon juice

For cake:
1. Preheat the oven to 180 degrees C. Grease and line four 6-inch cake pans
2. In a large bowl, cream the butter and  sugar in the until light and fluffy add  the lemon zest and mix.
3. Sift together the flour, baking powder, and  baking soda in a bowl. In another bowl, combine  lemon juice, and yogurt. Add the flour and yogurt mixtures alternately to the batter, beginning and ending with the dry ingredients.
4. Beat the white eggs in separate bowl until soft peak form. Gently fold in the egg whites with the cake batter using wooden spoon. Divide the batter evenly between the pans, smooth the tops, and bake for 20 - 30 minutes, until a toothpick inserted in the cake comes out smooth. 

For filling:
1. Melt the butter in a pot over medium heat. Remove the pot from the heat and whisk in the sugar, lemon juice, zest, and salt. Whisk in the yolks until smooth.
2. Return the pot to medium-low heat and cook, whisking constantly, until the mixture thickens. To check if the curd is thick enough, dip a wooden spoon into it and draw a your finger across the the back of the spoon; your finger should leave a path. Don't let the mixture boil. 
3. Immediately force the curd through a fine sieve into a bowl, using a wooden spoon. Let cool at room temperature, whisking occasionally. Refrigerate, covered, until ready to use.

For frosting:
1. Mix everything in a large bowl and mix until frosting smooth.

To assemble: Layer the cake with curd filling and covered with the lemon cream cheese frosting


p.s: Prayers to all passengers and crews on flight MH17. Hope the loves one for those on board stay strong.


Read More

Sunday 13 July 2014

D.I.Y Brownie Mix

I'm trying to reduce canned products as much as possible due to the BPA effects to our body, so I opt for products in glass jars/bottles instead. Besides, there are so many things that I can do with the jars and bottles instead of sending them to the recycling center. You can check out this Pinterest board for cool ideas of reusing your glass materials.

There is this satisfying  feeling when I do something, and giving it to someone. As for that, I made my own brownie mix in a glass bottle for my dad's in law birthday. I used the recipe from GoodFood with a slight modification, and used a 1 liter glass bottle for that. 


Brownie Mix

In the bottle
1/2 tsp salt
50 g plain flour
70 g cocoa powder
50 g plain flour
100 g dark brown sugar
100 g caster sugar
100 g dark chocolate break into small pieces (I used 86% Cote D'or)

Plus:
150 g melted butter
3 beaten eggs

Method:
1. Layer the dry ingredients in a one liter bottle, based on the recipe above. Press each layer down before adding the next.
2. If you want to give to someone, include a card with the following instructions: Put the dry ingredients in a large bowl and mix well. Combine the mixture with melted butter and eggs and mix. Pour into a lined 9' x 9' pan and bake at 180 C for 20 - 35 minutes or until the surface becomes dry. 


Read More

Sunday 6 July 2014

Brownies with Dates - Recipe

Alone without a company I brave myself to watch a PhD defense at Aula, my first time going there and watching one. I've read one of the papers written by the PhD candidate, and was intrigued with his study. The process was alien to me, and I was wondering how it goes. Suddenly there was a loud knock on the floor and all the audiences stand. A female with a robe holding a scepter entering the hall with the PhD student accompanied with two paranymphs in their fancy suits. I was dumbfounded, and I can feel my jaw was dropping as I was too amazed with what just happened. Never would I have expected this event was going to be too formal and traditional. 

As he stand at the podium, he started off with the introduction of his study. I listened to him diligently, trying to get the whole idea. Shortly after he finished another loud knock was heard and the opponents (examiners) and defendants entered the room. I spotted S, my supervisor, as one of the defendants. Unlike the rest he was wearing unmatching jacket and pants with tomato designed tie and messy hair and a big smile on his face. It was hard for me to control my laughter, but S really made the formal event to be more laid back, which I like.

The event then started with the opponents asking questions to the PhD candidate, each was given specific time and the candidate answered each of their questions confidently. I had no idea what they were talking about, but I had the feeling neither did the rest of the floor. Whenever the opponents said 'Figure' or 'Table,' all the audiences flipped the paperback thesis that was given to us when we entered Aula, trying to make sense what was going on, and yet failed to grasp the idea (for me that is). When the 'debate' stop, all the opponents and defendants went out of the hall and entered again 10 minutes later with a Doctoral diploma handed to the candidate. At that moment, he's no longer a PhD student, but a Doctor.  I was so happy for him even though I don't know him personally. I can imagine the hard work that he went through, and the joy when he received his diploma.


Brownies with Dates
[Click for the printable version]

Ingredients:
100 gm dark chocolate (I used 86% Cote D'or)
120 gm butter
250 gm castor sugar (You can reduce this amount if you want, the sugar here is not as sweet as the one in Malaysia)
3 large eggs
30 gm cocoa powder (I used Dutch process)
50 gm flour
1/2 teaspoon salt
11 Dates, pitted and cut into small pieces (I used Medjool dates)

Method:
1. Preheat oven at 180 °C. Line parchment paper on 8' x 8' pan with the paper extending at the sides.
2. Combine chocolate and butter in a microwaveable bowl and melt them in the microwave for 2 minutes, stopping at every 30 seconds and mix (or you can melt them using the double boiler method). Let it cool for a moment and combine sugar in the chocolate mixture.
3. Beat eggs in a large bowl, and combine the chocolate mixture with the eggs and mix using wooden spoon. Combine cocoa powder, flour, salt and dates and mix well. Pour the batter in the baking pan and bake for 30 minutes or until the surface looks dry and the sides are beginning to come away from the pan.
4. Leave the brownies to cool at the room temperature and cut into 16 pieces.


Read More

Sunday 29 June 2014

Rhubarb and Strawberry Crumble Pie - Recipe & Ramadan Mubarak

I had conversation with my sister before about the things that she wanted to eat, things that not common in Malaysia and pretty hard to get our hands on - fennel (the bulb), radish (the European radishes - Raphanus sativus), rhubarb, and many more. I was not that interested before, not until I have seen them fresh and aplenty at the Wageningen market. I'm curios how these common temperate climate vegetables/fruits taste like. Asking my hubby who is not into culinary doesn't help either even though he grew up eating them. So each week I'm planning to buy these 'uncommon' (uncommon for me who grew up in a tropical country that is) vegetables/fruits and experimenting them at our kitchen.

There were many rhubarbs at the market today, which were sold pretty cheap. Looking at them reminds me of celery, but they are from different family. My hubby warned me the sour taste of rhubarb, and I told him I'm going to make pie out of it mix with strawberries. He was keen with the idea, as long he is not helping me out with making the pie (geez thanks).

I had not prepared my favorite pie dough beforehand (which you guys can get the recipe from Majalah Rasa July issue which I had written), so making crumble pie is the next best thing (or even better).


Filling
A bunch of rhubarb - cut into 3 cm long
250 gm strawberries - cut into quarter
1 tablespoon lemon juice
4 tablespoons of castor sugar
A dash of cinnamon powder and nutmeg
1 tablespoon of corn flour

Topping
1 cup flour
2 tablespoons castor sugar
1 teaspoon cinnamon powder
6 tablespoon cold unsalted butter - cut into small pieces 
A dash of salt

Method:
1. Place the rhubarb, lemon juice and sugar  in a deep dish (I used square 8' x 8') and cover the dish with foil and bake at 180 °C until the rhubarb is tender. 
2. While waiting prepare the topping - mix everything in a large bowl (or you can use food processor) and mix until the dough becomes sandy (or crumbly). Place the dough in the fridge while waiting for the rhubarb to cook.
3. After the rhubarb becomes tender, mix with strawberries and corn flour and cover the filling with the topping and bake for 30 - 40 minutes or until the crust becomes golden brown. Serve with powdered sugar and whipped cream. 


As for the experience goes, the pie was good, but I had to put lots of powdered sugar to complement with the sour taste haha. I should have put more sugar in the pie, but then again I like the fact that I can control the sweetness by using the powdered sugar. As for my hubby, he said he likes it and can't imagine he would have eaten rhubarb again after all this year.

Owh, have a great and wonderful Ramadan. Ramadan will be a challenge for those living at the Northern hemisphere so hope we can go through it :)


Read More

Sunday 22 June 2014

Recipe: Vegetarian lemon tea cake with berry sauce

The unstable weather in Wageningen drives me crazy sometimes. Davis has unpredictable weather too, but only in few seasons (and not all four of them). I can experience all hot, cold, sunny, cloudy, windy and rainy weather in one day here in Wageningen. Looking at the weather forecast website is an hourly routine, and it is my new best friend. Good thing I have bought new rain jacket so I can bike to the campus without being irritated when it suddenly rain (maybe haha).

On a good note, the crazy weather is the only thing that I don't like about Wageningen so far, the rest is awesome! People are friendly - strangers greet me whenever I pass by them, sometimes they even greet me in Bahasa which I find adorable.The nature is so pretty, and this place is calm and peaceful. Fresh produce is a lot, and you can even buy it for cheap.

Owh talking about local produce, I was going gaga over the fruits sold at the market. Lots of summer fruits and I can't help buying many varieties. We bought 2 kg of fresh cherries last week, and was planning to make cherry pie but had to change my plan as 'dear' hubby ate 1.8 kg of them (literally!) *speechless* -_-!!! We didn't buy any cherries this week though but I managed to grab few berries for my own use.

I baked vegetarian lemon tea cake as I wanted something refreshing, and lemon goes well with blueberries, or even with other berries. I have a lot of Greek yogurt left so I used that to make delicious and moist vegetarian cake. The recipe below is something that I created myself, it might not be perfect but I find the cake to be not that sweet (just the way I like it), has light flavor, moist and taste delicious. A perfect tea cake to serve to quests plus easy to prepare :D


Vegetarian Lemon Tea Cake with Berry Sauce (Click to print the recipe)

Vegetarian Lemon Tea Cake 

125 gm unsalted butter
4 tablespoon castor sugar (you can add more if you want)
200 ml Greek yogurt
1/2 teaspoon vanilla extract
1 3/4 cup flour (cake flour is better)
2 teaspoon baking powder
100 ml corn oil
Finely grated  zest of 1 lemon (you can add/reduce this if you want)


Berry Sauce (Serving: Two people)

7 large strawberries, cut into quarters
15 pieces blueberries
1/2 tablespoon sugar (or more)
1 cup water
A dash of salt
A dash of nutmeg

For serving: 1 cup whipping cream - beat until fluffy (I don't like to put sugar in my whipping cream, you can do that if you want it to be sweeter)


Method:

1. Preheat oven to 180°C
2. Beat butter and sugar in a large bowl until fluffy. Add Greek yogurt and vanilla extract and mix until combine. Put flour, baking powder in the mixture and mix, add oil and lemon zest and continue beating for one more minute until everything is combined. Pour the batter in 8' x 8' square pan and bake for 25 minutes or until toothpick inserted into the cake comes out clean. Cool off the cake to room temperature.
3. To make the sauce: Combine everything in a medium pot on a medium to high heat, mash the berries using potato masher and cook until the sauce is thicken (you can add or reduce the water if you want, and you can also add corn flour to thicken up the sauce).
4. To serve: Cut the cake into square pieces, serves with berry sauce and whipped cream and garnish with fresh berries. This cake is delicious serving warm or cold.


p.s: Sugar in Europe is less sweet than the one in Malaysia, so I advice you to reduce the amount of sugar if you follow this recipe and adding more little by little if you want it to be sweeter. 


Read More

Sunday 15 June 2014

Recipe: Black and white pudding

It's been almost two weeks since I came to Netherlands. It's a beautiful country and I can't stop saying pretty since the day I arrived. Wageningen is a small and pretty city, it reminds me a lot of Davis (maybe it's prettier here haha). Our apartment is surrounded by parks and nature and we enjoy walking to the arboretums nearby. The campus is small, and I like the fact that my office, lab and greenhouse is all at one place. The idea of cycling from one end to another is not really fun. Albeit Netherlands is known for its flat land, this place is a little bit hilly and cycling from campus to home can be quite challenging for me.

Grocery shopping is awesome as the market has fresh local produce, even finding fresh halal meat is easy. Baking supplies on the other hand is another story. It's pretty hard to find few ingredients  here (baking soda and cream of tartar for example), not to mention the price is not compatible with my wallet. I will buy the baking stuff one by one, and yeah seems like I have to buy most of the things online (read: 'cheaper').

I haven't tried much of the local sweets, but the honey and nut cake from one of the local bakeries is yummy! I was searching for the recipe but couldn't get my hand on it. Seems like it's their very own special recipe. Owh well, maybe I can try making something similar later. Stroopwafel is to die for. I know few people don't like it because of the sweet caramel filing, but the cookies taste great when you complement it with coffee and tea (without sugar please!).

Anyway, there was a Malaysians get-together few days ago for sunset viewing and watching football match of Netherlands vs Spain (wasn't it such a great match! haha), and I prepared simple pudding which I find awesome. It's a combination of chocolate and vanilla pudding and I put chocolate ganache and stroopkoeken (a butter cookies version of stroopwafel) for extra flavor. You can use other cookies if you want, but I find having the cookies gave that extra crunch to the pudding. Owh yeah, this is American+British pudding thus the texture is different than Malaysian type of pudding.


Black and White Pudding (makes 12 -16 pudding in ramekins)

Chocolate pudding (recipe source from Nigella with few modification)

    100 grams dark chocolate (I used IKEA's dark chocolate)
    100 grams unsalted butter
    4 tablespoons of caster sugar (you can use more if you want, I love my desserts less sweet)
    4 large eggs
    50 grams plain flour
    ¼ teaspoon baking powder
    1 pinch of salt


2-1/2 cups milk, divided
Pinch salt
2 tablespoons of caster sugar (you can add more if you want)
3 tablespoons cornstarch
1 teaspoon vanilla extract
1 tablespoon butter

For filling and chocolate ganache

12-16 stroopkoeken (or you can use other butter cookies)
180 gm dark chocolate (I used IKEA's dark chocolate)
200 gm cream (I used 30% cream)

Method

  1. Preheat the oven to 180°C.
  2. Break up the chocolate and melt it with the butter in a bowl in the microwave or in a double boiler. Once it's melted, sit the bowl on a cold surface so that the chocolate cools.
  3. Beat the eggs and sugar until thick and pale and moussy, then gently fold in the flour, baking powder and a pinch of salt.
  4. Fold in the slightly cooled chocolate and butter mixture and then put 1/3 in each ramekin and bake for 20-25 minutes. While waiting for the chocolate pudding to be cooked, prepared the vanilla pudding.
  5. Place 2 cups milk and salt in a saucepan. Sprinkle sugar on milk and do not stir; heat over medium-high. Quickly combine cornstarch with remaining milk and mix well. When milk comes to a full boil, remove saucepan from the heat and stir in cornstarch mixture. Pudding will begin to thicken. Return to the heat and cook for 1 minute. Remove from the heat; stir in vanilla and butter. 
  6. To make chocolate ganache, break chocolate in small pieces and put it in a bowl with cream and  microwave or double boiler until the chocolate melts. 
  7. To assemble: take out the chocolate pudding from the oven, put stroopkoeken on top of it and cover with vanilla pudding. Let's everything cool and set, and put chocolate ganache on top of the vanilla pudding. You have to make sure the vanilla pudding is set or it will mix with the ganache. 
  8. Put it in the fridge and let it cool for 2 hours or overnight. Garnish with raspberries or anything you desire.

The sour taste of raspberries complements well with dark chocolate. 


Hope you guys love this recipe! 
Read More

Friday 30 May 2014

My birthday cake

'I thought you are done with baking' said my husband sarcastically as he saw me baking my birthday cake. I told him that I'm not going to bake anymore last week (and maybe several weeks before too haha) as we want to clear out the ingredients before we leave Malaysia, but the idea of me not having a birthday cake baked by me is kind of sad when I have baked for others for their special days.

So today, dear hubby, is the last day I'm baking before we are leaving to the Netherlands, officially!! (as if you are ever reading my blog)

We had a large pint of Greek yogurt thus I decided to make my favorite vegetarian cake with a twist - pandan flavor! I bought few pandan leaves couple of days ago and made pandan paste out of it. I combine it with my favorite vegetarian cake recipe and voila, delicious and moist vegetarian pandan cake. I decorated the cake with cream cheese frosting and made salted caramel cream cheese filling for between the layers. And yeah, I obviously had to decorate the cake purple - my favorite color!


Side view of my birthday cake - 6' tall pandan cake with salted caramel cream cheese frosting decorated in purple ruffles.

The taste was awesome! Just the way I like it - moist, not too sweet and refreshing pandan smell. I think I will miss baking this cake in Netherlands. The chance of finding fresh pandan leaves is slim, plus I don't like the idea of using the yucky and unnatural pandan flavoring.

Top and side view of the cake. Isn't it pretty? :)

For those who are not familiar with pandan, I would say that it has nice and subtle fragrance of rose. It gives out light and refreshing taste, and tastes well when you complement it with palm sugar :) I think most (if not all) of the Southeast Asian countries use it in their cuisines.

So yeah, happy birthday (more like belated) to me and hope I can make more delicious and pretty cakes in the future :D


Natural green color of the pandan makes this cake looks so yummy!
Read More

Tuesday 27 May 2014

Making memories

Okay, pretty schmaltz post title haha. So few more days before we are going to the Netherlands. At the moment we are spending our time at my parents house in Baling, Kedah. I feel a bit sad, knowing that I won't come back to this homey place for four years. I will miss this place for sure - the pretty environment, my loved ones and my mom homemade food! My parents slaughtered turkeys few days ago, knowing how much their daughter and son-in-law love eating them :)

I had spent some quality time with my friends and family. Having potluck party with the UCDavis peeps, lunch and tea party with UPM colleagues, lab mates and friends, meeting fellow bakers whom I adored (you guys know who you are ;) ), and yet there are more people who are meaningful in my life whom I am unable to meet due to my tight schedule :( . Sorry guys, hope we can still keep in touch.

Anyway, seems like I will be more active with blogging in the future *hooray* Need to hone my writing skills before it gets worst hoho.


Delicious desserts made by me for my farewell tea party held last week. Cute deco from my lovely sis Farah Munirah from @makeupbyferrarossa :)


Read More

Thursday 22 May 2014

'Sabbatical' leave from baking in Malaysia until 2018

Received email for e-ticketing to Amsterdam today. Our flight will be on the night of the 1st of June. I haven't started packing yet, not planning to bring lots of things like I used too when I went to the States for undergraduate study. My feeling is a mixture of sad, happy, excited and scared. PhD will be a very different journey than undergraduate and Master, and I do hope that I can go through it.

Muniroh's Bakery has been a wonderful experience since me and hubby started it in 2012. I am not going to stop it, just that it will be like taking a 'sabbatical' leave from baking until I'm done with my study. I will still bake in the Netherlands though, just that it will be more like stress reliever than baking for order.

I have had very wonderful journey with Muniroh's Bakery. Made new friends, met up with lots of people, and had the chance to meet up with other talented bakers ;) I had sweet and bitter memories which help in making the business grow, and all I can say is thank you so much for supporting me and Muniroh's Bakery and hope we can meet up again one day <3

Me with the last wedding cake that I made before going to the Netherlands. Beautiful picture taken by my good friend who is also a very talented photographer, Peter Law (019-8844337). Thanks Peter :)
Read More
Related Posts Plugin for WordPress, Blogger...
Powered by Blogger.

© 2011 Muniroh's Bakery, AllRightsReserved.

Designed by ScreenWritersArena